
Ruffled Heart Zipper Pouch
- Abby Luchsinger
- Feb 14
- 6 min read
Updated: Feb 14

What better way to chase away the winter drearies than to spread a little quilty love with this adorable Ruffled Heart Zipper Pouch! It’s quick and fun, a great way to use your favorite fabric scraps, and makes a sweet quilty accessory to use or give. I made three in an afternoon for my little girls for Valentine’s Day and can’t wait to make more!
Ready to get started?
First up, gather the needed supplies listed below. The fabrics shown in the tutorial examples are Art Gallery Fabrics prints from my own scrap bin.
Supplies:
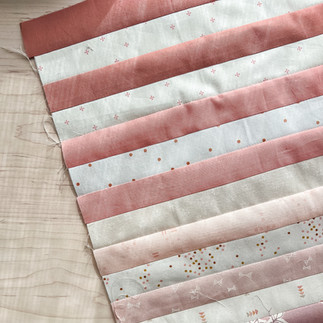
(6) 1½” x 10” strips of pink low volume prints or solid fabric* (exterior)
(6) 1½” x 10” strips of cream low volume prints or solid fabric* (exterior)
(1) 1 ½” x 27” strip of coordinating fabric (ruffle)
(2) 1 ½” x 3” rectangle zipper tabs
(1) 2” x 2” square clasp tab
(1) 12½” x 6½” rectangle of lining fabric
(1) 12½” x 6½” piece of Pellon Flex Foam 2-sided fusible stabilizer
Heart Template (print at 100%)
Heat erasable pen (Pilot Frixion or similar)
*Note that pink and cream are the colors used in the example and referenced in the instructions but you can choose any two contrasting colors to use to make a checkered design. Alternatively, you can use skip the checkers and just use (1) 12½" x 6½" rectangle for the exterior.
Links to products provided are affiliate links to the exact, or very similar, products used in the sample.
Instructions:
Quilted Panel Assembly
Arrange the 1½” strips so that pink strips and cream strips fall on every other row as shown (pink, cream, pink, cream, etc.). Sew the strips together and press seams toward the pink rows to make a strip unit measuring 12½” x 10”.
Cut the unit across the seams into (6) 12½” x 1½” segments. Discard any remainder.
Arrange 3 of the segments with the pink end at the top. Arrange the remaining 3 segments with the pink end at the bottom between the first 3 segments so that the checkered pattern appears and each pink square lines up with white squares on either side, and vice versa. Sew the segments together and press seams open to create the checkered panel top measuring 12½” x 6½”.


Layer the lining fabric right side down, the foam stabilizer and the checkered panel top, right side up. Follow the manufacturer instructions to fuse the fabric to the foam stabilizer. Quilt the layers together. I chose to do simple straight-line quilting on the diagonals of the checkered squares in both directions.
Use the Heart Template to trace 2 hearts on the quilted panel and cut them out. Decide which heart will be on the front and back of the pouch.


Ruffle Assembly
Match up the 1½” ends of the ruffle strip, right sides together, and sew together with ¼” seam allowance. Press the seam open.


Press the entire strip in half lengthwise wrong sides together to make a loop that is ¾” wide.

Increase the stitch length on your sewing machine to 5mm and sew a basting seam ¼” from the raw edges all the way around. Stop stitching before you overlap your stitches and be sure to keep the thread tails long at both the beginning and end of the seam. Holding a thread from the beginning of the seam, gently push the fabric and work it down the thread so that it gathers. Then hold a thread from the opposite end of the seam and gently work the fabric away from that point as well so that the entire length of the fabric is gathered evenly. Press the two sides of the loop together and ensure that the length of the loop halves is approximately 8 ¾” (as shown).

Arrange the ruffle around the exterior side of the back panel of the pouch with the raw edges of the ruffle aligned with the raw edge of the panel. Be sure that the ruffle fabric is evenly distributed around the heart. It may be helpful to fold the ruffle in half (like you did to measure it in the photo above) and mark the two end points to use as reference points for the center dip in the heart and the tip of the heart. Clip the ruffle in place. Then sew the ruffle to the back panel with ⅛” seam. Once the ruffle is sewn in place, remove the basting seam you used to create the ruffle by clipping the threads in a few places and gently pulling them out.


Zipper Assembly
Use the zipper line on the heart template or measure 2” down from the top edge of the front panel of the pouch and cut the panel along the zipper line.

Fold the zipper tabs in half wrong sides together with the 1½” ends aligned. Press the fold.
Tuck the ends of the zipper tape (with the zipper pull on it) into the folded zipper tabs so that the fold is on the bottom of the zipper tape and the raw edge of the zipper tape aligns with the raw edges of one side of the zipper tab. Sew the tabs in place using a ¼” seam allowance. Then pull the zipper tabs out away from the zipper and over the seam. Press the tabs in place and trim any excess fabric flush with the top of the zipper tape.


Center the bottom of the zipper tape (with the zipper closed and the pull on the left) along the zipper line edge on the bottom portion of the front panel, right sides together. Sew together with ¼” seam allowance. Then fold the panel away from the zipper tape and press. Sew along the folded edge with ⅛” seam allowance. Be sure to catch the edge of the zipper tape in the seam to further secure it.
Next center the top edge of the zipper tape along the zipper line edge of the top portion of the front panel, right sides together. Sew together with ¼” seam allowance. Then fold the panel away from the zipper tape and press. Sew along the folded edge with ⅛” seam allowance and again, be sure to catch the edge of the zipper tape in the seam to secure it.


Place the heart template on the front panel with the zipper line and the actual zipper aligned to check that the front panel is still the correct size. Trim minimally as needed to match the panel to the template if the panel ended up a little larger after zipper installation.
Clip Assembly
Fold the 2” clasp tab in half wrong sides together and press. Then unfold and fold the raw edges, wrong sides together, in towards the center fold line. Press those folds and then refold along the center fold so that the raw edges are enclosed. Sew along both the single folded and double folded edges with ⅛” seam allowance.
String the tab through the swivel lobster clasp and fold in half so that the raw ends are aligned. Clip the ends of the tab to the upper left curve front panel with the raw edges aligned. Sew in place with ⅛” seam allowance.


Pouch Assembly
Open the zipper, place the front and back pouch panels right sides together, and clip in place. Take care to ensure that the ruffle is tucked in all the way around, as well as the clasp.
Slowly and carefully sew the panels together using a ¼” seam allowance around the raw edges. Where there are many layers of fabric, you may need to guide the needle through it using the hand wheel. To reinforce the seam, I recommend sewing around a second time and back stitching at the beginning and end of the seam.


Make a few clips around the curves of the hearts up to (but not through) the seam. Also, be sure to clip up to the seam of the center dip of each heart and cut away the excess fabric at the tip of each heart. This will help the edges to stay smooth once turned.
Carefully turn the pouch right side out through the zipper opening.. Gently push out and smooth the edges with a pointed, but not sharp, object such as a turner, stylus or closed scissors. Press the pouch flat.
Your Ruffled Heart Zipper Pouch is now complete and ready to use or gift. Enjoy!

