
Quilted Tote Bag Tutorial
- Abby Luchsinger
- Dec 12, 2023
- 4 min read

Updated: Dec 12, 2023

One of my favorite bonus projects to include in my quilt patterns are mini quilts. These single block patterns are so versatile - you can make them into a wall hanging, turn them into a throw pillow or...you can use them to make a handy (and adorable!) tote that's perfect for gifting or running errands with. Totes are a quick and fun project to put any mini quilts or orphan quilt blocks you have to use, and just the right size to try out new techniques on too. You can use them to practice free motion quilting, dense machine quilting, hand quilting, or embroidered details, and make a darling bag in the process.
Check out these incredible totes my pattern testers made with the mini size of my Butterflight and Starlit quilt patterns. These beauties were made by Tamara Darragh of @remivailstudio (left two photos) and Heather Heck of @heck.yes.sewco (far right photo).


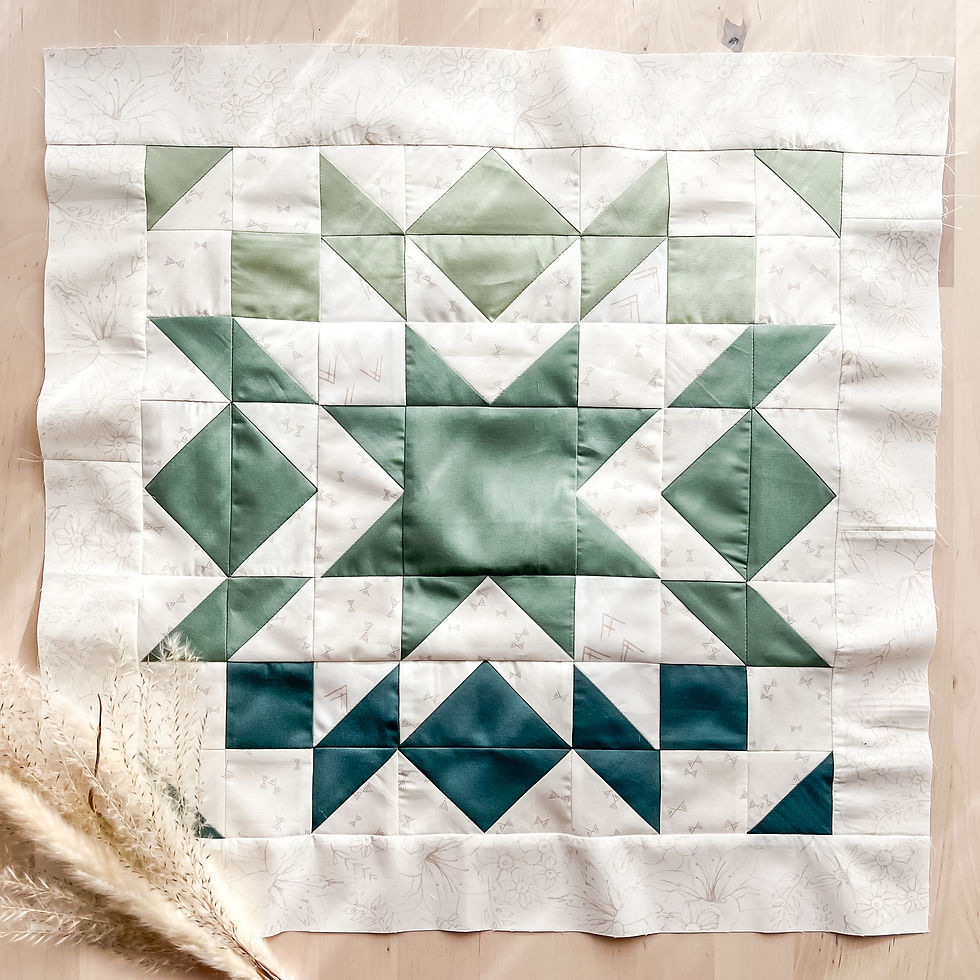
The quilt pattern I used to make the tote shown in this quilted tote bag tutorial is my Printemps pattern. The quilt blocks are sized at 20" finished already, but I decided to size it down to 16" and add a border so that I wouldn't lose any of the design in the seams.
Ready to get started making your own quilted tote? Let's go!
Supplies:
(1) 20.5" x 20.5" square unfinished quilt block*
(1) 20.5" x 20.5" square backing fabric
(2) 20.5" x 20.5" squares lining fabric
(2) 20.5" x 20.5" squares of batting
(2) 30" lengths of 1" - 1.5" cotton webbing (this tutorial shows 1" webbing)
*Note: You can use a smaller size quilt block for this project by either adding borders to increase the size to 20.5" or by adjusting the size of the backing, lining and batting pieces to match the block size.
Instructions:
Quilting
Start by layering the quilt block right side up on top of (1) batting square. Baste in place with spray or pins and quilt as desired. I chose to do simple straightline quilting 1/2" apart with my walking foot.
Repeat layering, basting and quilting with the backing fabric square on top of the remaining batting square.


Outer Bag Construction
Lay the quilted block and the quilted backing right sides together and pin sides and bottom together leaving the top open. Sew 1/2" seam around the three pinned sides of the tote.

Use an acrylic ruler and mark a 2.5" square in each bottom corner. Cut both squares out then press the seams open on the sides and bottom of the tote.


Next, create the boxed corners of the tote by matching up the side seam and bottom seam on one corner. Pin in place and sew with a scant 1/2" seam allowance along the raw edges making sure to back stitch at the beginning and end of the seam to secure. Repeat to create the boxed corner on the remaining bottom corner.


Lining Construction
Follow the same steps listed in the outer bag construction with the (2) lining squares to create the lining.
Handles
Turn the outer bag right side out. Then measure 3.75" in from the the left side of the bag front and 2.25" down from the top of the bag. Mark this point. Repeat marking this point on the right side of the bag front and on both sides of the back of the bag.
Take one 30" length of webbing and fold over 1" on the end. Place on the bag so that the marked point is the bottom outside corner of the handle with the folded raw edge of the webbing sandwiched under the handle. Sew a square approximately 1" x 1" and across the diagonal of the square in both directions to secure the webbing to the bag. Make sure to back stitch at the beginning and end of your seam.


Fold over the remaining end of the webbing by 1" again and secure to the right side of the bag front aligning to the marked point using the same process. Be sure that the handle is not twisted prior to securing in place.

Repeat these steps on the back side of the bag with the remaining 30" length of webbing to create a second handle.
Final Assembly
Push the outer bag inside of the lining right sides together and carefully tuck the handles away from the raw top edge. Pin the outer quilted bag to the lining, then sew a 3/8" seam around the top edge of the bag making sure to leave a 3"- 4" opening for turning.


Turn the bag right side out through the opening. Then press the lining and quilted bag away from the seam making sure to neatly press the seam allowance into the opening as you do.
Top stitch 1/8" seam around the top edge of the bag and over the webbing of the handles securing them to the top of the bag. Then stitch a second seam 1/4"away from the first seam to further secure the lining, quilting and handles together.


Congratulations! Your quilted tote bag is complete and ready to use! I hope you enjoyed making this project. If you share your quilted tote on social media, be sure to tag me @abbymaed so I can see what you make. I can't wait!
~ Abby


This was such an interesting look at how much care and skill can go into restoring a special piece of clothing, especially with such detailed repairs. When I have some free time, I also enjoy simple entertainment like which is Kawasaki motorcycle jacket a fun way to relax and challenge myself after reading stories like this.
This information about MP Bhulekh Portal is very useful and helps users understand online land record services easily and clearly today.
Very helpful content about Sarathi Parivahan Sewa because it explains online driving licence applications and renewal services in an understandable manner.
I recently came across OK Win while searching for some interesting online gaming platforms, and I must say it really caught my attention. The interface looks quite user-friendly and smooth, which makes it easy even for beginners to get started without any confusion. I’m planning to explore it more and see what kind of games and earning opportunities it offers. If anyone has already tried it, I would love to hear your experience with OK Win.
Mình có lần lướt đọc mấy trao đổi trên mạng شيخ روحاني thì thấy nhắc nên cũng tò mò mở ra xem thử cho biết. Mình không tìm hiểu sâu rauhane chỉ xem qua trong thời gian ngắn để quan sát bố cục s3udy cách sắp xếp các mục và trình bày nội dung tổng thể. Cảm giác là các phần được trình bày khá gọn, các mục rõ ràng nên đọc lướt cũng không bị rối Berlinintim, với mình như vậy là đủ để nắm tin cơ bản rồi. q8yat